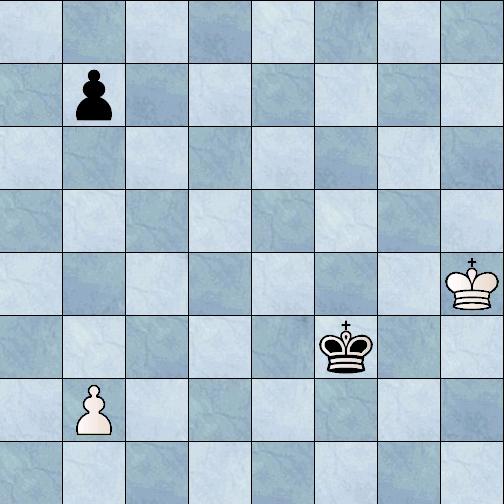
White to move and draw.
I spend hours to this problem, but I just don't get it.
I can find the line by trial and error but not by reasoning.
White has two means to defend: he can try to hunt for the black pawn or he can defend the key squares of the black pawn.
But the two pawns are not sitting ducks, they can move whenever suitable. That makes it very confusing.
I'm just not able to find a reasoning that can guide the white moves.
The plus side on this is: even the simplest situations with only two pawns sometimes are too difficult for grandmasters. So if I master this I can score with it.
The downside is that I don't have a clue how to find a reasoning.
This is the only line to a draw:
1. Kg5 Ke4 2. Kf6 Kd5 3. Ke7 Kc6 4. Ke6! b6 5. Ke5 Kc5 6. Ke4 Kc4 7. Ke3 b5 8. Kd2 Kb3 9. Kc1 Ka2 10. b4! Kb3 11. Kb1 =
Can you find a reasoning to guide white's moves?
Only two pawns, how difficult can it be?
Man you are consistant. 7 Days of tournament play and back to studying. I'm not sure if I could solve this even by trial and error. I suppose a way to solve this is to visualize the end position for a draw (there may be multiple options).Then determine what position is one move away from forcing that position. Then determine what position is two moves away from forcing that position. Then repeat as necessary........I imagine that a grandmaster has a number of stock images of what position draws and has a methodology to figure it out.
ReplyDeleteMy theory is a 2300 ranked player recognizes more draw positions and positions that are "further out" from the draw than the 1900 ranked player.
I'd be interested in what others (who unlike me) actually know what are talking about think about this tactic. 8)
I'm not sure I can give a rationale for the entire line, but here is one element I understand: When Black's pawn reaches b5, White must respond b4. This is because once Black captures White's pawn the position Black - Kb4, Pb5 vs. White Kb2 is a draw when it is Black to move. On the otherhand, if White allows Black's pawn to reach b4 then Black wins since Black - Kb3, Pb4 vs. White - Kb1 is lost for White regardless of who is on move.
ReplyDeleteNow that I think about it, this probably explains the drawing line. White must go after the Black pawn until it advances. At that point, White blockades with b4 and then heads to b1 with his king.
Thx for the input guys, it clarifies matters. It is as if I have to learn a total new game.
ReplyDeleteJust to add my view: Moves 1 to 3 are forced logical: Kings struggle for better position. Move 4 of White: opposition. Black wins it back at the expense of a pawn move. On row 3 Black loses opp again because of blocked c3, so he moves again pawn. This allows White to protect his own pawn. 10. b4! is space gain, forcing Black go give up control over key squares (a3, b3, c3) when taking the pawn.
ReplyDeleteWholly crap that's complicated. I didn't understand a word y'all said.
ReplyDeletePS