Invisible patterns II
Here you have a nice and clear example of corresponding squares from SOPE
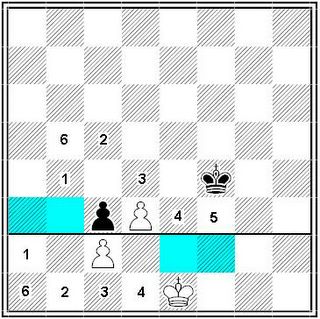
Black to move and draw. e1 = 5 (because I don't want it to look messy)
The first invisible pattern you have to see is the line between the 2nd and 3rd rank.
Black isn't allowed to pass this line because he has to keep an eye on d3 (rule of the square).
The second invisible pattern contains the key squares (in blue)
If white manages to conquer one of the key squares then black is lost.
So black has to defend these squares.
The third invisible pattern you have to see is that of the corresponding squares.
If the white king appears on a square with a certain number, then black has to put his king on a corresponding square with the same number. Otherwise black is lost.
As you see there is a shortest path between both area's with key squares, which for both white and black are of equal distance.
If white decides to attack the key squares a3 and b3 he heads for square 1 (=a2)
At the same time the black king has to run for the corresponding square with number 1 (=b4)
Knowing all this, the defence of black is simple:
1. ... Kf3! ;corresponding square 5 (e1=5=f3)
2. Kd1 ;if white goes to f1 then black can counter attack against pawn c2 by 2. ... Ke3! That's why f1 has no number.
2. ... Ke3
3. Kc1 Kd4
4. Kb1 Kc5
5. Ka2 Kb4 =
The same problem I already had encountered in Euwes book, but without the clear explanation.
It costed me two hours to figure everything out correctly. I invented even the system of corresponding squares myself, using numbered beercaps. But I had made one mistake, because on Ka1 I had planned Ka4. Maybe because I needed so many beercaps I was not quite sober?
In that case black comes to late when white heads to e2.
So thats why SOPE saves me a lot of time.
Further of course a warm applause for Celtic Death, who managed to slay 1001 enemies with 1 donkey jaw-bone and entered the Hall of Fame.
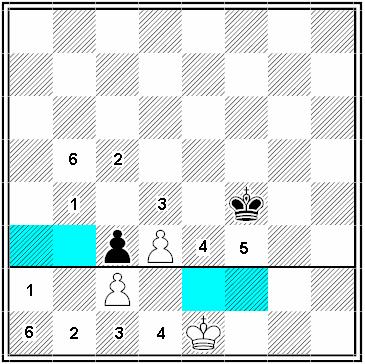
Once I finish the remaining Cycles, I think I will join you in some endgame training.
ReplyDeleteGreat diagrams!
I must say, from your reviews of SOPE, I have to agree with Sancho. I definitely could always use some improvement in my endgame especially if it is as easily understood (and hopefully "rapid") as you make it sound.
ReplyDeleteGK
Hey, Tempo, fine lessons. Just go on. I can hardly wait. And it saves me to purchase a book, hehe ... At this very moment I am planning my training after the circles. My focus will be vision drills, and endgame vision fits very well in this scheme.
ReplyDeleteI originally though 1...Ke3 also draws here, but it doesn't. Great illustration with the numbers and colors.
ReplyDelete