Corresponding squares
I couldn't find a clear explanation of corresponding squares at the web, so I decided to follow the suggestion of PMD and write my own.
The theory is explained in SOPE, but I find it difficult to use it in such theoretical form in OTB play. So I try to make thinks more practical.
I develop my own terminology along the way
The simplest form of corresponding squares is the opposition.
In the next examples white is the attacker, who wants to win and black is the defender, who is happy with a draw.
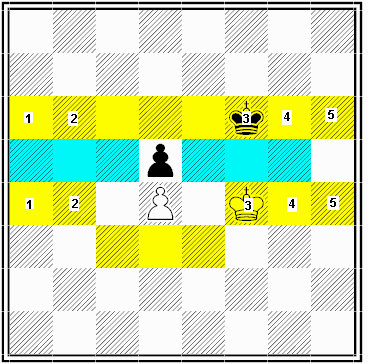
diagram 1.

White to move.
Black wants to protect his own half of the board.
Green = border area
Yellow = frontline
Not colored = hinterland
The attacker has moved his king from the hinterland to the frontline on square 6 (=f4)
To prevent white from invasion, black has put his king on the CORRESPONDING SQUARE (=f6). This square gets therefore the same id: 6
Every move of white along the frontline has to be answered by black moving to the corresponding square. Any other move will lose.
A corresponding square in the black camp has always the same id as the square in the white camp.
Square 6 on the white side is flanked by square 5 and square 7.
The same is true for square 6 of black.
So the black king will have no troubles in following the actions of the white king.
If white decides to obscure matters he can try to go to the hinterland, e.g. to square 13.
Square 13 has 3 connections with the frontline (square 4, 5 and 6)
There is a corresponding square in the black hinterland. This gets the same id: 13
From this square there are 3 connections to blacks frontline. So black can follow every move of white as long as he steps on de corresponding squares
The picture isn't distorted by pawns, so that will be no problem.
In the following diagram there are a few pawns that disrupt the pattern
diagram 2

White to move.
Blue = keysquares
Yellow = frontline
To prevent white from invading, black as to move to the corresponding square.
The keysquares are just in the border area.
On files c, d and e you see no corresponding squares.
That is because the opposition doesn't play a role on these files since the kings can't approach each other here.
I called this the shadow area.
Black has only to make sure that he crosses the shadow area in time to step on square 2, in case white tries to pass on the queenside.
That shouldn't be a problem.
With pawns other elements come into play.
For instance black can counter attack against the white pawn, in stead of following the corresponding squares.
In the next picture you see a much bigger distortion of the smooth symmetrical set up.
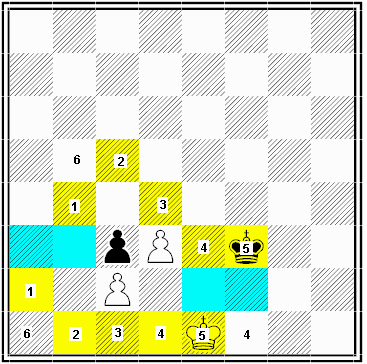
diagram 3

The border area is so distorted that the kings positions are shifted, so they must not be opposite anymore to keep the draw.
Notice that there are two squares with id = 4 on the white side.
If white heads for g2, the black king will counter attack the pawn on c2.
If the white king heads for 6 (= a1), he stands on a square next to 1 and 2.
Black is lucky he has a corresponding square at b5, next to his own 1 and 2.
This is a composition of Grigoriev, special in the sense that white has so little space to manoeuver that black can just follow.
If we shift the whole position one rank upwards, things become totally different.
diagram 4

White has got a whole lot of hinterland for manoeuvring now.
If he plays 1.Kd1, he is next to 3, 4 and 5.
The corresponding square in the black camp is e5, which is next to 3, 4 and 5.
But since that square isn't available for the black king he can't prevent white from invading.
Notice that he can't go to e3 or f3, because he has to stay in the square of the white d-pawn, to prevent promotion.
Play can go as follows:
1.Kd1 Ke4
2.Kd2
This typical king manoeuvre is called triangulation.
The white king stands face to face with the black king, but since "der Temposchlucker ein Tempo hat geschluckt" (= the white king has lost a tempo) the black king has to give way!
2. ... Kf4
3.Kc1 and the black king is to late to protect the keysquares at queenside.
Now you know where my nickname comes from.
(From "Mein System" of Nimzowitsch)
The theory is explained in SOPE, but I find it difficult to use it in such theoretical form in OTB play. So I try to make thinks more practical.
I develop my own terminology along the way
The simplest form of corresponding squares is the opposition.
In the next examples white is the attacker, who wants to win and black is the defender, who is happy with a draw.
diagram 1.

White to move.
Black wants to protect his own half of the board.
Green = border area
Yellow = frontline
Not colored = hinterland
The attacker has moved his king from the hinterland to the frontline on square 6 (=f4)
To prevent white from invasion, black has put his king on the CORRESPONDING SQUARE (=f6). This square gets therefore the same id: 6
Every move of white along the frontline has to be answered by black moving to the corresponding square. Any other move will lose.
A corresponding square in the black camp has always the same id as the square in the white camp.
Square 6 on the white side is flanked by square 5 and square 7.
The same is true for square 6 of black.
So the black king will have no troubles in following the actions of the white king.
If white decides to obscure matters he can try to go to the hinterland, e.g. to square 13.
Square 13 has 3 connections with the frontline (square 4, 5 and 6)
There is a corresponding square in the black hinterland. This gets the same id: 13
From this square there are 3 connections to blacks frontline. So black can follow every move of white as long as he steps on de corresponding squares
The picture isn't distorted by pawns, so that will be no problem.
In the following diagram there are a few pawns that disrupt the pattern
diagram 2
White to move.
Blue = keysquares
Yellow = frontline
To prevent white from invading, black as to move to the corresponding square.
The keysquares are just in the border area.
On files c, d and e you see no corresponding squares.
That is because the opposition doesn't play a role on these files since the kings can't approach each other here.
I called this the shadow area.
Black has only to make sure that he crosses the shadow area in time to step on square 2, in case white tries to pass on the queenside.
That shouldn't be a problem.
With pawns other elements come into play.
For instance black can counter attack against the white pawn, in stead of following the corresponding squares.
In the next picture you see a much bigger distortion of the smooth symmetrical set up.
diagram 3
The border area is so distorted that the kings positions are shifted, so they must not be opposite anymore to keep the draw.
Notice that there are two squares with id = 4 on the white side.
If white heads for g2, the black king will counter attack the pawn on c2.
If the white king heads for 6 (= a1), he stands on a square next to 1 and 2.
Black is lucky he has a corresponding square at b5, next to his own 1 and 2.
This is a composition of Grigoriev, special in the sense that white has so little space to manoeuver that black can just follow.
If we shift the whole position one rank upwards, things become totally different.
diagram 4

White has got a whole lot of hinterland for manoeuvring now.
If he plays 1.Kd1, he is next to 3, 4 and 5.
The corresponding square in the black camp is e5, which is next to 3, 4 and 5.
But since that square isn't available for the black king he can't prevent white from invading.
Notice that he can't go to e3 or f3, because he has to stay in the square of the white d-pawn, to prevent promotion.
Play can go as follows:
1.Kd1 Ke4
2.Kd2
This typical king manoeuvre is called triangulation.
The white king stands face to face with the black king, but since "der Temposchlucker ein Tempo hat geschluckt" (= the white king has lost a tempo) the black king has to give way!
2. ... Kf4
3.Kc1 and the black king is to late to protect the keysquares at queenside.
Now you know where my nickname comes from.
(From "Mein System" of Nimzowitsch)
good post, and nice to know the origin of your name.
ReplyDeleteFANTASTICAL! I didn't understand much, anyway the idea is FANTASTICAL! Thank you for sharing!
ReplyDeleteAnon,
ReplyDeletethanks for the cheering.
the Gregoriev 1921 study confounds me on a practical level. e2/f2 and a3/b3 are generally nominated as the "key squares" by which the corresponding squares are then determined. How is this done? It all looks logical once mapped out but there is some initial premise that completely escapes me here. There must be a more accessible "over the board" approach to this kind of position.
ReplyDeleteOrigipinch,
ReplyDeletesearch for 'corresponding' at my blog and see if I already answered your question.