Posts

Showing posts from February, 2017

dear Liza, a hole

Image
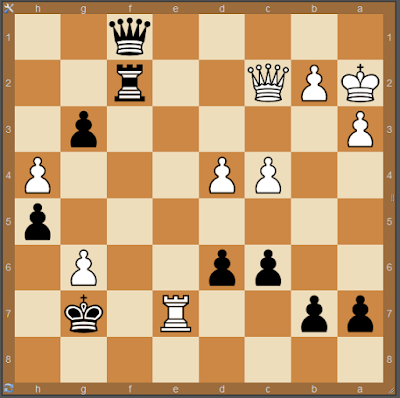
When a position is very crowded, I have often problems to find the right continuation. The next position took me 14 minutes to find the wrong move. Diagram 1. White to move  r5r1/3b1nk1/p2p1ppb/1ppPp3/4PqP1/2P1NPN1/PPB1QK1R/7R w - - 1 1 [ solution ] I'm going to ponder about what exactly is the cause of my failure, and which knowledge is needed to prevent such debacle in the future. Feel free to comment already, that is helpful. UPDATE It took quite some time to grasp what is going on exactly in this position, but with the  aid of the comments I was able to unravel it in the end. The problem with  this position is, that with  T+E (Trial and Error) you soon dismiss 1.Nef5+ Bxf5 2.exf5 as too slow. Aox even called this move "silent", albeit between quotes. Only when everything else fails, you might come back and have a deeper look. And that is exactly what we try to avoid. How can we think about this position with as less calculation as possible? Somewhere

Another hole

Image
When you come close to the endgame, the rules of chess seem to change. I don't know what causes that feeling. While the amount of pieces diminishes, the amount of space increases. The net result being that the amount of possibilities doesn't become lesser when you near the endgame. Only the nature of the possibilities changes. The diagram below is a type of position that is continuously spilling my rating points due to my talent to find the wrong squares. Let's see if we can expel some calculation by logical pondering. Diagram 1. Black to move 6r1/1p1b3p/3P4/2P2k1P/1P2p2K/5B2/5P2/4R3 b - - 0 1 [ solution ] The last move of white was 1. Bxf3 , taking a pawn. Feel free to comment already. That makes it easier for me to get to the essence of the position, since you guys think differently. Update After 2.exf3 Re7 we reach the position that gives the most problems. How to judge it? Materially, black has a bishop for two pawns. Let's have a look at the cr

Plugging a hole

Image
We talked before about my special talent to flea with my king in the wrong direction. That is definitely a hole in my bucket. With a continuous flow of rating points leaking through it. Let's see if we can find a universal plug for this hole. Black to move 8/pp2R1k1/2pp2P1/7p/2PP3P/P5p1/KPQ2r2/5q2 b - - 3 2 This position is halfway the solution of this problem How to answer the check? I'm going to think this over. Feel free to comment already. That was of great help the previous post. I will update this post whenever I have found an adhesive plaster. Update What I'm looking for, is a way to avoid as much calculation as possible, and guide my attention to the right plan. What is going on? At first there is the promotion motif. On both sides. I see promotion as the same as gaining wood. There is not much difference between capturing a hostile queen, or getting a friendly one yourself. Reaching the promotion square is the same as capturing a queen. There are a

Plugging the holes

Image
When solving chess problems, I fail in the application of simple chess logic. Simple chess logic should guide the attention to the right parts of the board. Actually I find it quite surprising that the application of logic is so weak, since usually it is my forte. In tests I score invariably extremely high when it is about logical reasoning. So why is it so weak when it comes to chess? Undoubtedly, chess has so many possibilities, that the mind is easily overwhelmed. I often feel overwhelmed. The normal approach would be to study the area and simplify it. Until it becomes manageable for the mind. As long it is not manageable for my mind, I am as bad as anyone else when it comes to the application of logic. Over the years I have studied a lot, and I always tried to simplify matters to a manageable degree. I discovered the duplo attacks, I discovered the thought process as guide to the attention, I discovered the reason behind overprotection and I found a whole lot of chess truths

Promotion motif

Image
This position has troubled me for quite a few days. I'm looking for the essential elements that make me fail. What don't I know that I should know? What knowledge transforms this position from complex to simple? How is that knowledge reusable for other positions? Black to move 8/4kp2/4p1p1/1pqb2P1/1p2nQ2/P6B/1PP5/1K1R4 b - - 1 1 [ solution ] On the white side The white king has little mobility due to lack of space. Black can set up a battery with Qc4, which is a duplo attack. A duplo attack is based on lack of time, as you know. b2 is immobile due to its double function, protecting both c3 and a3 On the black side The black queen must keep an eye on the invasion square c7 The black knight protects the invasion square f6 What I missed The reason that I experienced difficulty with this position is twofold. I missed the counter attack motif Rf1 Qxf7+. I did notice the promotion motif, but I have not made an in-dept study of it just yet. So I mist an impo

The other branches

Image
We have seen that there are three sorts of immobility. Time (duplo attack) Space (trap, mate) Function (defense, overloading) Until recent, my main focus on immobility has mostly been on time. The duplo attack which I coined, is based on time. Two attacks, with only time for one defense. Albeit I was well aware of the trap, I for long have been almost blind for function. The big tree of motifs provides an ideal framework to give other knowledge a solid base to be hanged upon, in a way that we can find back that knowledge. For every single problem to be solved, the PLF (PoPLoAFun) system is useful. This doesn't mean that the sole use of the PLF system is enough to solve every problem. The system needs extensions. The coming time I will try to inventory which extensions are needed. You have to be a little patient, since during the inventory it is too early to draw already any conclusions. I presume. Let's elaborate on the assault one more time again. Diagram 1. Blac

Limited mobility

Image
Volatile pieces are hard to catch. We only make a chance when the mobility is limited. There are three ways that mobility can be impaired: Time. When king and queen are knight forked, there is no time to safe both. Space. When you entomb a bishop, it has no squares to flea to. Function. When a piece has a duty, it has to stay in contact with its duty. Either it has to sacrifice itself, or it must give up its duty. So always look at the most immobile targets first. White to move 1r6/3qn1k1/R4bp1/3p3p/1p6/1N2P1P1/1P1Q1P2/5BK1 w - h6 0 1 [ solution ] Blacks Q, R, N and B are all more or less mobile. Only the king is immobile due to its function to protect the bishop. 1.Rxf6 Kxf6 Who is the most immobile piece now? Q, R, N are all volatile still. But the king has now little mobility due to lack of space . 2.Qd4+ The king has four squares to go to. 2... Kg5 3. Qf4# lack of space = mate 2... Kf5 3. Qf4+ Ke6 4.Nd4# lack of space = mate 2... Ke6 3. Nc5+ lack of ti

Stay away from the LoAs

Image
Sometimes you have to defuse an assault on your own king. I seem to have a special talent to let my monarch flea to the wrong square. Which underpins the notion that my subconscience must know something about chess, since if it would move randomly, I would sometimes flea to the right square by chance. Diagram 1. White to move q1R5/p2Q4/p4k2/8/4b3/P7/1P3P1P/2q3K1 w - - 0 1 [ solution ] The critical position is reached in the following diagram. Where should the white king find a refuge? Diagram 2. Stay away from the LoAs I thought it is important to stay away from the PoP (Point of Pressure) f3, where the black queen and the black bishop converge. So I dared not to move to e2. But this is position is not about mate, but about getting the rook. The white king must stay away from the two LoAs (Lines of Attack) against the white rook. For black it is paramount that the queen stays into contact with both LoAs all the time. Which means it must stay on the g-file. And again a s

King chase

Image
If the hostile king is already contained in a box, the PLF (PoPLoAFun) system can be used to guide the attention towards the right cues. But when the king isn't boxed in yet, it would be nice to have some guidance too. What are the potential boxes we can chase the king into? How do we decide between them? Of course everything can be decided by actual calculation, as gm Watson has argued comprehensively. But can we formulate some help to get the mind thinking in the right direction? I'm not sure yet. Diagram 1. White to move 2b3k1/pp5p/1q1r2p1/1Np1Q3/2p5/1P4P1/P4P1P/6K1 w - - 0 1 [ solution ] 1.Nxd6 seems to be the obvious move. However, the immediate recapture of the rook isn't very advantageous. We have a few forcing moves up our sleeve. We can postpone the recapture for a while, and retake under better, decisive conditions. Right now, we contain the black king in a box existing of 3 squares: g8, f8 en f7. When the knight recaptures, it covers the invasion square

Assault

Image
When I wanted to show you a position to demonstrate the PLF (PoPLoAFun) system, I skimmed through my failures, looking for suitable positions. I noticed that I rejected about half of the positions. Today I wanted to know why. I found that 40% of my failures could be fixed by applying the PLF system well. 47% were positions with the assault motif (I assume). In 13% of the cases I mishandled the promotion motif. Improvement in the PLF department should come with experience overtime. But it is frustrating to fail because of ignorance about the assault motif. I am somewhat  inclined to think that the assault motif is just a special occasion of the plf system, but investigation will decide on that. I already will give you a position on which you can already comment, if you like. Later today I will update the post when I start thinking about it. White to move 3r4/5p1R/4kp2/4pN2/p5P1/3nPPKP/r7/3R4 w - - 0 1 [ solution ] Update. Now I look at it, it seems way more simple and st

Looking for Fun

Image
Seeing PoPs (Points of Pressure) and LoAs (Lines of Attack) is rather straightforward. Both have highly geometrical properties, and hence they can be seen by every vulture circling above the board. You can't win games by things that can be seen easily by everybody. You just order your mind "give me all PoPs", and it will obey you immediately. The same is true for all LoAs. You may miss an important one every now and then, but with a little exercise, you probably will do well. Everybody who has healthy eyes in his head can do equally well. The most important reason to map the PoPs and the LoAs, is that it will put you on the track of pieces that are partly immobilized due to their Fun(ction). Function is different. It can't be seen with your physical eyes. You can only see it with your minds eye. And that can give you an edge. In case of function, what you see with your physical eyes, is in contradiction with what you see with your minds eye. With your physical eyes

MeatLoAf LoAving LoAfer

Image
In the following diagrams the crucial LoAs (Lines of Attack) are highlighted. Diagram 1. White to move r3r1k1/2qn1pb1/p5p1/6P1/2p5/1N2B2Q/PPP4P/2KR1R2 w - - 0 1 [ solution ] On both PoPs (Points of Pressure) are B.A.D. (Barely Adequate Defended) pieces. It is a common scenario. You can take a hanging piece, but you have to defend against the counter attack. The white queen has the Function to defend e3, and is partly immobilized because of that. Diagram 2. Black to move 2q2bk1/R3r2p/6p1/3nB3/8/1p3N1P/5PPK/Q7 b - - 1 1 [ solution ] The white bishop is partly immobilized because its function is to defend the LoA b8-h2. The white queen is partly immobilized because its function is to defend a7. Diagram 3. White to move 3rrk2/p1R1Nppp/8/3b4/4n3/P5P1/5PBP/4R1K1 w - - 1 1 [ solution ] Both the white knight and the black knight look B.A.D.. But the LoA e1-e7 happens to cover both. Diagram 4. Black to move 2r2qk1/6pp/Q1Np4/4p3/P5b1/8/1r3PPP/3R1RK1 b

PoPshow

Image
I will give you a few diagrams with the crucial PoPs (Points of Pressure) highlighted. From there you can start reasoning. Diagram 1. White to move 3r1r1k/1p2n1np/p1p2p1Q/6p1/PP1PqN2/1B5R/6PP/5RK1 w - - 1 1 [ solution ] The deciding PoP is h7. It is defended by the black queen. The black queen is limited in mobility by its Function. It must stay in contact with h7. How can you breach the contact? Diagram 2. White to move r4rk1/1pq1bpp1/p1b1pn1p/5N2/7B/2PB1Q2/PP3PPP/R3R1K1 w - - 1 1 [ solution ]  The deciding PoP is e7. It is defended by the black queen. The black queen is limited in mobility by its Function. It must stay in contact with e7. How can you breach the contact? Diagram 3. White to move. 2k1r3/2b2R2/1pp2r2/p1p2NN1/P1P3pP/1P5n/5P2/3R3K w - - 1 1 [ solution ] There are a lot of problems with the same scenario: you can take a hanging piece for free, but you must defend against a counter attack. PoP for the counterattack is f2. How can you ta

Chessbase PGN viewer